
WordPress plugin
Testomato Monitoring is the official WordPress plugin. It connects your WordPress or WooCommerce site to Testomato in about thirty seconds — you enter an email address, the plugin creates your account and a project for the site, and a widget on your WordPress dashboard shows the current status.
The checks themselves never run on your server. Testomato tests your site from its own machines in nine locations, which is why the alert still arrives when WordPress, PHP or the whole host is down.
Requirements
Section titled “Requirements”| Requirement | Notes |
|---|---|
| WordPress | 5.8 or newer (tested up to 7.1) |
| PHP | 7.4 or newer |
| WooCommerce | Optional — detected automatically when active |
| Testomato account | Created by the plugin (14-day free trial, no credit card) — or an account you already have, connected with its API token |
Installation
Section titled “Installation”- In your WordPress admin go to Plugins → Add New and search for Testomato Monitoring. Alternatively, download the ZIP from wordpress.org and upload it under Plugins → Add New → Upload Plugin.
- Click Install Now, then Activate.
- Go to Settings → Testomato Monitoring.
Connecting your site
Section titled “Connecting your site”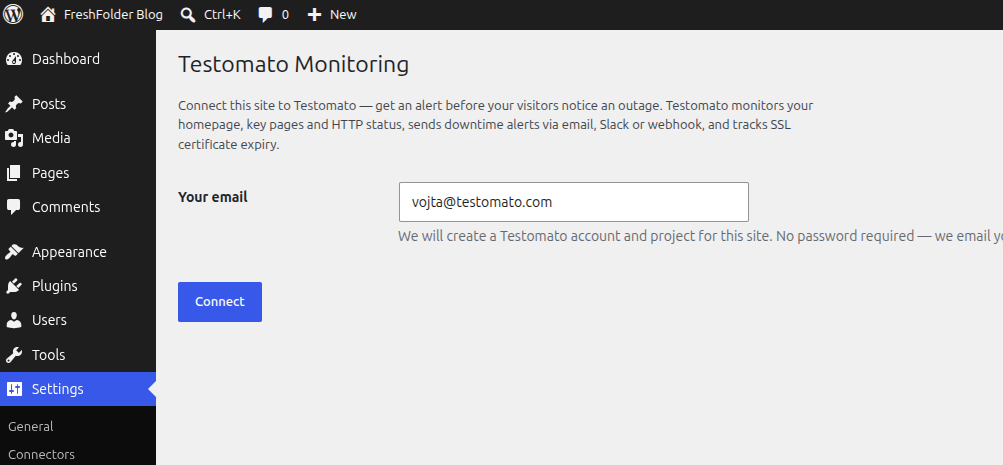
- The Your email field is pre-filled with your WordPress administration email. Change it if you want the Testomato account to live under a different address.
- Click Connect.
- If the address does not have a Testomato account yet, a One-time code field appears and we email you a code that confirms the address. Paste it in and click Connect again.
- If the address already has a Testomato account, the plugin says so straight away and offers Reconnect with API token — see Already have a Testomato account? below.
- The page reloads with the connected view.
That is the whole setup for a new account: nothing to copy and no password to choose. The emailed code only confirms your email address during sign-up — it is not a sign-in code, and it cannot sign an account in. The one case that does need a Testomato API token is connecting an account you already have.
What happens when you connect
Section titled “What happens when you connect”- A Testomato account is created for the email address you entered — or, if that address already has one, the existing account is used once you paste its API token.
- A project is created for this site's home URL — or, when the account already has a project for this site, that project is adopted instead of a duplicate being created.
- Testomato reads your homepage and suggests the key pages worth monitoring; those URLs are added to the project as tests.
- When WooCommerce is active, the cart and checkout URLs are added as well.
- Uptime monitoring and SSL certificate monitoring are enabled for the project.
Already have a Testomato account?
Section titled “Already have a Testomato account?”That is a normal case, not a failure. When the address you enter is already registered with Testomato, the plugin recognises it immediately and does not email a code — codes only confirm the address of a new sign-up and can never sign an existing account in. A Reconnect an existing account section appears on the settings page instead:
- In Testomato, open account settings → API token and copy the token.
- Paste it into the plugin's Testomato API token field and click Reconnect with API token.
What happens next depends on what the account already holds:
- No project for this site — the site is added as a new project, exactly as a fresh sign-up would be.
- One project already matches this site — that project is adopted with its full history; no duplicate is created and nothing inside it is changed.
- Two or more projects match — the plugin stops and names the candidates rather than guessing. Remove the duplicates in Testomato, or connect the site from the project you want to keep, and try again.
The connected settings page
Section titled “The connected settings page”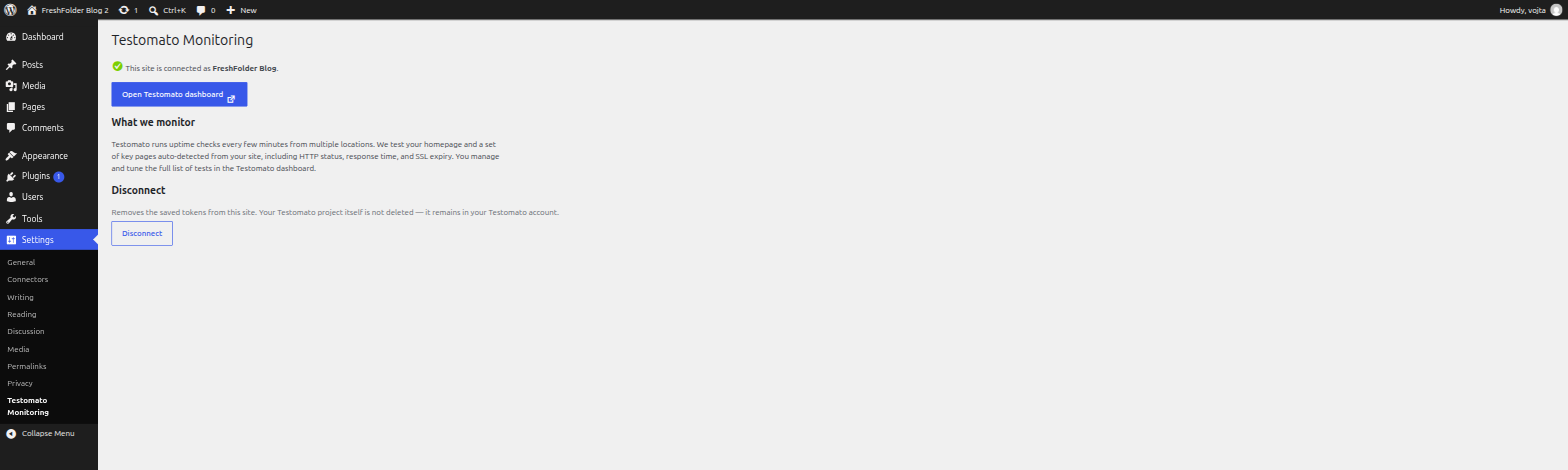
Once the site is connected, Settings → Testomato Monitoring shows:
- Open Testomato dashboard — a one-click link that signs you in to your Testomato project without a password.
- What we monitor — a summary of what the project checks.
- Disconnect — see Disconnecting below.
The dashboard widget
Section titled “The dashboard widget”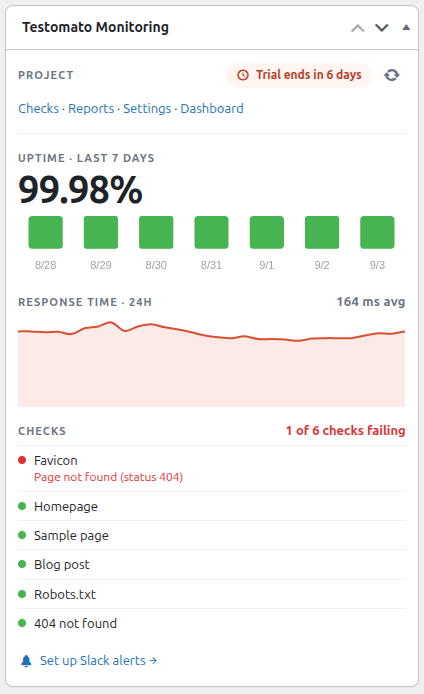
The plugin adds a Testomato Monitoring widget to the main WordPress dashboard. From top to bottom it shows:
- Project — the project row, with a trial badge such as Trial ends in 6 days and plain text links to Checks, Reports, Settings and Dashboard in Testomato. The refresh icon in the heading row re-fetches the status immediately instead of waiting for the cached value to expire.
- Uptime · last 7 days — a large uptime percentage plus one colour-coded bar per day, so an incident from earlier in the week is still visible.
- Response time · 24h — an interactive trend line with the average response time over the last day, drawn in the Testomato dashboard's own colours.
- Checks — a summary line such as 1 of 6 checks failing, followed by the individual checks, each with a status dot and, when it is failing, the reason — for example Favicon — Page not found (status 404).
- Set up Slack alerts → — a link to the Slack notification settings in Testomato.
Status values are cached for a few minutes so that opening the dashboard never waits on a network round trip. The charts are drawn with a copy of Chart.js 4.5.1 bundled inside the plugin — no CDN is contacted from your admin.
If you don't want the widget, use the Screen Options menu at the top of the WordPress dashboard and untick Testomato Monitoring.
Changing what is monitored
Section titled “Changing what is monitored”The plugin bootstraps the project; everything after that is managed in Testomato. Click Open Testomato dashboard and you can:
- add or remove monitored URLs, including pages behind a login;
- define the text, HTML, headers or structured data that must be present on a page — see Checks;
- set response-time thresholds and the check interval;
- choose where alerts go — email, Slack, webhooks and the other notification channels;
- invite colleagues to the project.
Changes made in the dashboard are not written back to WordPress. The plugin reads status only.
Disconnecting the site
Section titled “Disconnecting the site”Go to Settings → Testomato Monitoring and click Disconnect.
This removes the stored tokens from this WordPress installation. Your Testomato project is not deleted — it stays in your account with its full history and keeps monitoring the site. To stop monitoring entirely, delete the project in the Testomato dashboard as well.
Deleting the plugin removes every option it created (all testomato_monitoring_* options, including any left by older versions under the former testomato_monitor_* prefix, and the cached status values). Deactivating alone leaves them in place, so you can reactivate without connecting again.
What the plugin sends to Testomato
Section titled “What the plugin sends to Testomato”The plugin contacts the Testomato API at https://testomato.com/api and sends:
| When | What |
|---|---|
| You click Connect | The email address you entered, the WordPress administrator's first and last name (from your WordPress profile, falling back to the site name), your WordPress and WooCommerce version numbers, and the site's home URL. |
| You submit the one-time code | The code and the email address, to confirm the address is yours. |
| You reconnect an existing account | The Testomato API token you pasted, so we can identify the account and its projects. |
| While setting up | Your site's public home URL, so the test suggestion service can propose pages to monitor. |
| While connected | The project or user identifier, to read the status, uptime, response times and remaining trial days shown in the dashboard widget. |
No content of your posts, users, comments or media is ever sent. Testomato then crawls the public pages of your site from its own servers, the same way a search-engine crawler does — see TestomatoBot.
The tokens returned by the API are stored in the WordPress options table under the testomato_monitoring_ prefix.
Service terms: testomato.com/terms-of-service · Privacy policy: testomato.com/privacy-policy
Troubleshooting
Section titled “Troubleshooting”Connect fails because the site is not reachable
Section titled “Connect fails because the site is not reachable”Testomato validates the URL by fetching it before creating the project, so the site must be reachable from the public internet. A site on localhost, on a private IP range, behind basic auth or behind a firewall that blocks unknown crawlers cannot be connected. Allow TestomatoBot through and try again — Wordfence and Cloudflare are the usual culprits.
The email address already has a Testomato account
Section titled “The email address already has a Testomato account”Not a problem — the plugin detects it before anything else happens and offers Reconnect with API token. Paste the token from account settings → API token in Testomato; see Already have a Testomato account? above. No code is emailed in this case, so do not wait for one.
The API token is refused
Section titled “The API token is refused”Tokens from the account settings page expire after about an hour, so one copied earlier in the day no longer works. Copy a fresh token and paste it into WordPress straight away. If the plugin instead reports that several projects match this site, remove the duplicates in Testomato first — it will not choose between them for you.
The one-time code never arrives
Section titled “The one-time code never arrives”The code is only sent when the address is signing up for a brand-new Testomato account; an address that already has an account is sent to the API token path instead. If you are signing up, check the spam folder first. The code is sent to the exact address in the Your email field, which may differ from the address you expected if your WordPress administration email was changed. Codes are short-lived; click Connect again to get a new one.
The widget shows "no data yet"
Section titled “The widget shows "no data yet"”The first check results need a few minutes to appear after connecting. If the widget is still empty after ten minutes, open the Testomato dashboard and confirm the project has tests and that uptime monitoring is enabled — see Uptime monitoring.
The widget reports a problem but the site looks fine
Section titled “The widget reports a problem but the site looks fine”Testomato tests from outside your network, so it sees what an external visitor sees — including latency, geo-blocking and rate limiting that never affect you locally. Why does Testomato say my site is down when it's not? covers the usual causes.
The status is stale
Section titled “The status is stale”Status is cached for a few minutes. Use the refresh button in the widget to fetch it immediately.
Getting help
Section titled “Getting help”Write to support@testomato.com with your site URL and, if the problem is in the connect flow, the exact error message from the settings page. See also Support.